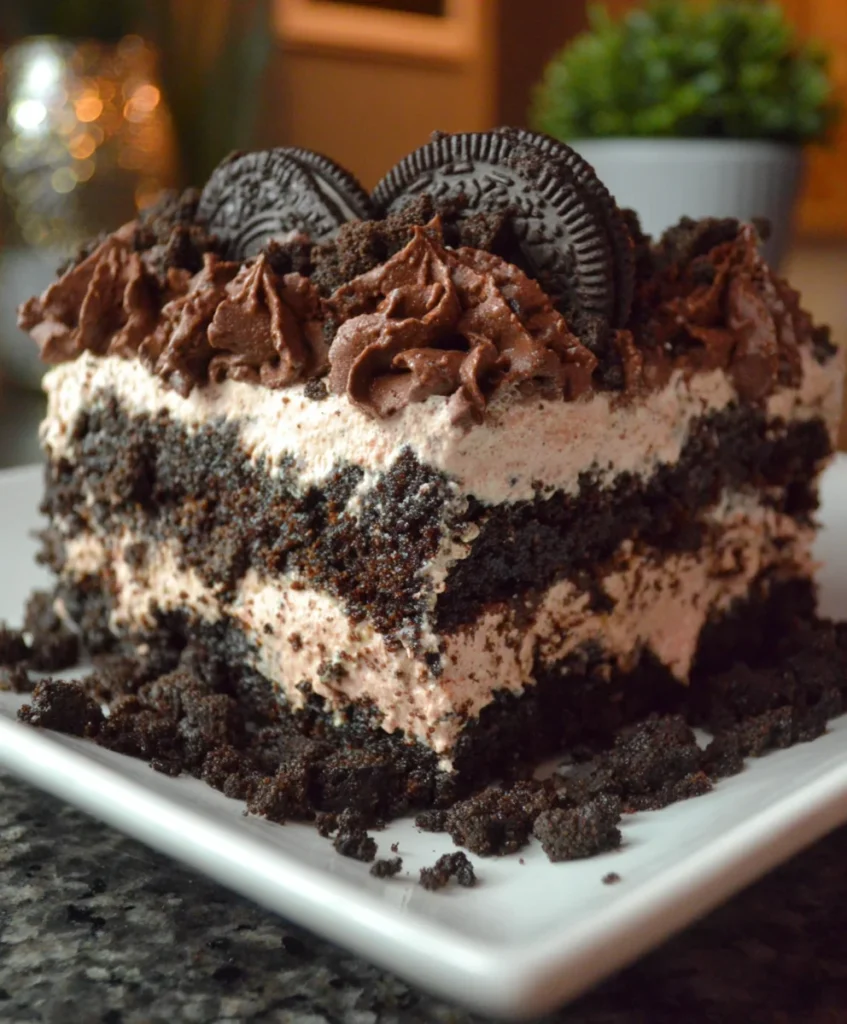
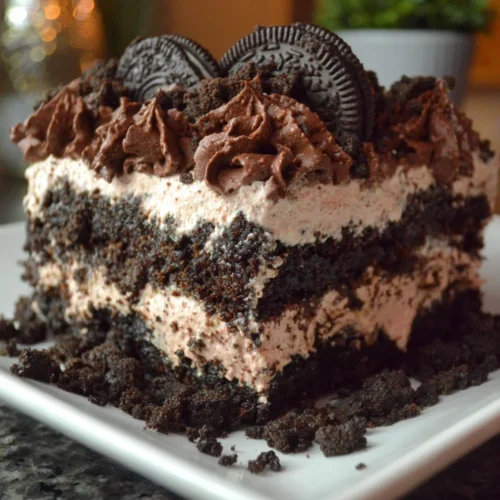
Are you ready to indulge in a dessert that brings out your inner child? Look no further than the delightful OREO DIRT CAKE. This fun and creative dessert combines the rich flavors of chocolate and cream cheese with the playful presentation of dirt and worms. Whether you’re celebrating a birthday, hosting a BBQ, or just looking for a sweet treat to enjoy at home, this cake will surely be a hit. With its layers of creamy goodness and crunchy Oreo crumbs, every bite is a delightful experience that will transport you back to your childhood. Plus, the best part? It’s incredibly easy to make, requiring just a few simple ingredients that you likely already have at home. Let’s dive into why you’ll love this recipe and how to create your very own OREO DIRT CAKE.
Why You’ll Love This Recipe
One of the many reasons you will adore this OREO DIRT CAKE is its unique and playful presentation. Imagine serving a dessert that looks like it came straight from a garden, complete with gummy worms and a dusting of Oreo crumbs! This not only makes for an eye-catching centerpiece at any gathering but also evokes a sense of nostalgia that appeals to both kids and adults alike. The combination of flavors is another reason to love this recipe. The rich, creamy layers of cream cheese and chocolate pudding blend perfectly with the crunchy, chocolaty Oreo crust, creating a delightful contrast in texture.
Moreover, this dessert is incredibly versatile. You can easily customize it by adding your favorite toppings or using different flavors of pudding. Want to make it even more decadent? Consider adding a layer of chocolate ganache or fresh berries. The options are endless! This OREO DIRT CAKE is also a no-bake recipe, making it perfect for those hot summer days when you don’t want to turn on the oven. Just mix, layer, and chill, and you’ll have a delicious dessert ready to serve in no time.
Finally, this recipe is a crowd-pleaser. Whether you’re serving it at a birthday party, a family reunion, or just a casual get-together, everyone will be looking for seconds. Plus, it’s a great way to get kids involved in the kitchen. They will love helping to crush the Oreos and layer the cake, making it a fun family activity. So gather your ingredients, and let’s get started on this delightful OREO DIRT CAKE!
Why You Should Try This Recipe
The OREO DIRT CAKE is more than just a dessert; it’s an experience. The first reason to try this recipe is its incredible flavor profile. The harmonious blend of cream cheese, chocolate pudding, and crushed Oreos creates an unforgettable taste that is both rich and satisfying. Each layer contributes to a delightful symphony of flavors that will have your taste buds dancing with joy.
Another compelling reason to make this cake is its simplicity. With minimal prep time and no baking required, it’s accessible for bakers of all skill levels. The straightforward steps allow you to whip up this dessert in less than an hour, although chilling it for a few hours is essential to achieve the perfect texture. Imagine impressing your friends and family with a stunning dessert that looks like it took hours to make when, in reality, it was quite the opposite!
Additionally, this OREO DIRT CAKE is perfect for any occasion. Whether it’s Halloween, a birthday party, or a summer picnic, it fits right in. You can even switch up the toppings to match the theme of your event. For Halloween, add gummy spiders; for a spring gathering, consider topping it with edible flowers. It’s a versatile dessert that can be tailored to suit your needs.
Lastly, this cake is a fantastic way to spark creativity in the kitchen. You can experiment with different flavor combinations or presentation styles. Want to make it gluten-free? Simply use gluten-free Oreos! Feeling adventurous? Try adding layers of fruit or other candies. The possibilities are endless, making this recipe a perfect canvas for your culinary creativity.
Ingredients and Necessary Utensils
Ingredients
- 1 package (15.25 oz) Oreo cookies
- 1/2 cup (1 stick) unsalted butter, softened
- 8 oz cream cheese, softened
- 1 cup powdered sugar
- 2 cups whipped topping (like Cool Whip)
- 2 cups milk
- 1 package (3.9 oz) instant chocolate pudding mix
- Gummy worms (for garnish)
- Optional: small flower pot (for serving)
Necessary Utensils
- Zip-top bag (for crushing Oreos)
- Rolling pin or your hands (for crushing Oreos)
- Large mixing bowl
- Electric mixer or whisk
- Spatula (for folding ingredients)
- Measuring cups and spoons
- Large serving dish or flower pot (for layering and serving)
- Refrigerator (for chilling)
Detailed Recipe Steps with Practical Tips
Step 1: Crush the Oreos
Begin by placing the Oreo cookies in a zip-top bag. Use a rolling pin or your hands to crush them into fine crumbs. Make sure to set aside about 1/2 cup of the crumbs for garnish later. Crushing the Oreos tightly will give you a nice texture for the bottom layer of the cake.
Step 2: Make the Cream Cheese Mixture
In a large mixing bowl, beat the softened butter and cream cheese together until smooth and creamy. This step is crucial as it sets the foundation for the cake’s rich flavor. Gradually add the powdered sugar, mixing until everything is well combined. Make sure there are no lumps for a smooth consistency.
Step 3: Add Whipped Topping
Gently fold in the whipped topping until fully incorporated. This will add lightness and volume to your cream cheese mixture. Be careful not to overmix, as you want to keep the airy texture of the whipped topping.
Step 4: Prepare Pudding Mixture
In a separate bowl, whisk together the milk and instant chocolate pudding mix until well combined. Let it sit for about 5 minutes to thicken. This is a crucial step that allows the pudding to set properly and provides that rich chocolate flavor.
Step 5: Combine Mixtures
Gently fold the pudding mixture into the cream cheese mixture until everything is thoroughly combined. This is where the magic happens, as the creamy chocolate pudding blends with the rich cream cheese, creating a luscious filling for your layers.
Step 6: Layer the Dirt Cake
In a large serving dish, start by layering half of the crushed Oreos on the bottom. Next, add half of the cream cheese and pudding mixture on top of the Oreos. Repeat with the remaining crushed Oreos and then the remaining cream cheese and pudding mixture. Be sure to smooth the layers for an even finish.
Step 7: Garnish
Sprinkle the reserved Oreo crumbs on top of the final layer. For an extra fun touch, place gummy worms on top of the cake. This will enhance the “dirt” effect and make it even more appealing to children and adults alike!
Step 8: Chill
Refrigerate the dirt cake for at least 4 hours, or overnight if possible. This chilling time is essential for allowing the flavors to meld together and for the cake to set properly.
Step 9: Serve
Once chilled, scoop out servings of the OREO DIRT CAKE and enjoy! If you used a flower pot, serve it directly from there for a fun presentation.
FAQ Section
1. Can I make this recipe gluten-free?
Yes! Simply use gluten-free Oreo cookies to make the entire cake gluten-free.
2. How long can I store leftovers?
The OREO DIRT CAKE can be stored in the refrigerator for up to 3-4 days. Just make sure to cover it tightly with plastic wrap or transfer it to an airtight container.
3. Can I use homemade whipped cream instead of Cool Whip?
Absolutely! Homemade whipped cream can be used in place of Cool Whip for a fresher taste. Just make sure it’s stabilized so it won’t weep in the cake.
4. Is it possible to add different flavors of pudding?
Yes! Feel free to experiment with different flavors of pudding, such as vanilla or butterscotch, to create unique variations of your OREO DIRT CAKE.
5. Can I freeze the dirt cake?
While it is best served fresh, you can freeze the dirt cake for up to a month. Just make sure it’s well covered to prevent freezer burn.
Conclusion
The OREO DIRT CAKE is not only a treat for the taste buds but also a feast for the eyes. Its fun presentation and rich, creamy layers make it perfect for any occasion. With simple ingredients and easy-to-follow steps, it’s a recipe that anyone can master. Whether you’re entertaining guests or enjoying a quiet night in, this dirt cake is guaranteed to bring smiles all around. So gather your ingredients, get creative, and dive into this delicious dessert today!
For more ideas and inspiration, check out our Pinterest page!
Oreo Dirt Cake
Equipment
- Mixing bowl
- Zip-top Bag
- Whisk
- Spatula
- Serving Dish or Flower Pot
Ingredients
Main Ingredients
- 15.25 oz Oreo cookies 1 package
- 1/2 cup Unsalted butter softened
- 8 oz Cream cheese softened
- 1 cup Powdered sugar
- 2 cups Whipped topping like Cool Whip
- 2 cups Milk
- 3.9 oz Instant chocolate pudding mix 1 package
- to taste Gummy worms for garnish
- 1 Optional: small flower pot for serving
Instructions
Instructions
- Crush the Oreo cookies by placing them in a zip-top bag and using a rolling pin or your hands to create fine crumbs. Set aside about 1/2 cup of the crumbs for garnish.
- In a large mixing bowl, beat the softened butter and cream cheese together until smooth and creamy. Gradually add the powdered sugar and continue to mix until well combined.
- Gently fold in the whipped topping until fully incorporated into the cream cheese mixture.
- In a separate bowl, whisk together the milk and instant chocolate pudding mix until well combined. Let it sit for about 5 minutes until it thickens.
- Gently fold the pudding mixture into the cream cheese mixture until everything is well combined.
- In a large serving dish or flower pot, layer half of the crushed Oreos on the bottom. Top with half of the cream cheese and pudding mixture. Repeat layers with the remaining crushed Oreos and then the remaining cream cheese and pudding mixture.
- Sprinkle the reserved Oreo crumbs on top of the final layer and garnish with gummy worms.
- Refrigerate the dirt cake for at least 4 hours (or overnight) to allow the flavors to meld and the cake to set.
- Scoop out servings of the dirt cake and enjoy!